Follow my blog with Bloglovin
www.bloglovin.com

Wednesday, March 27, 2013

Monday, March 25, 2013
Today I made...

Sorry about the belated post, I was supposed to get this one on Friday but I injured my neck rolling over in bed. Yes, I am that much of a klutz that I seriously hurt myself doing the simplest of tasks. I was out of commission for 3 days but am feeling great today and have full neck function! Huzzah!
I am thinking of starting a "See how many times Kez bangs herself up" tally on the blog, I think I am up to nasty injury number 3 already!
This was my first attempt at making the gorgeous parcels of deliciousness and they really were a lot of fun to make. In saying that I will be messing with the recipe slightly next time adding here and subtracting there but for the most part I had a great morning cooking these babies and I will most likely whip up another batch this week. If anyone has flavor requests please, send them my way!
Here goes...
Vanilla Macaron
Ingredients (makes about 24 macarons)
2/3 cup of ground almonds (you can grind them yourself, buy them pre ground by the pound or Bob's Red Mill Almond meal is a great product to try also)
1 1/2 cups of powdered sugar or icing sugar
3 large egg whites at room temp
5 tablespoons of granulated sugar
1 teaspoon of vanilla extract or seeds from 1/2 a vanilla bean
+ Cut a sheet of parchment paper (baking paper) to fit your baking sheet and draw 1 inch or 2.5cm circles on the paper spacing them at least 1/2 inch or 1.5cm apart. This will act as your guide when piping the batter onto your baking sheet and ensure all your macarons are the same size when sandwiching them with your butter cream.
+ Preheat your oven to 375F or 190C
+ Sift powered sugar and almond meal through a sieve twice and set aside.
+ In a mixing bowl beat your egg whites on high speed until they are foamy.
+ Gradually add granulated sugar and vanilla to the egg whites. Keep beating until meringue mixture is stiff, firm and glossy.
+ Add half of the sifted almond and sugar mixture, stir with a spatula and ensure you stir from the bottom scraping the bottom of the bowl and incorporating all the dry ingredients.
+ Add rest of the dry ingredients mixing in a light motion.
+ Here the macronnage starts; Macaronnage is a process used when mixing batter.
Tilt your mixing bowl to the side and press and spread out the batter against the bowl's sides, scoop the batter from the bottom and turn it upside down. Repeat this process about 15 times.
Note: If the process is done less than 10 times the macaron may lack lustre, repeat the process more than 20 times and you will have worked the batter too much resulting in oil stains on the surface of your macaron.
Another helpful hint, try keeping your almond meal in the fridge or freezer, this will ensure that heat will not ruin your meal. Almond meal spoils very easily and it's a fairly pricey item to be buying every time you a feeling like visiting the streets of Paris!
+ Attach a .4inch or 1.01cm round tip to a pastry bag
HINT: Before heaping the mixture into the bag, give the tip a twist so that the bag is closed off just before the tip, this will make it easier to scoop all the mixture into the pastry bag without any spillages.
+ Pour batter into your pastry bag and your are ready to pipe.
+ Pipe batter onto your pre circled baking sheet.
+ Give the bottom of your baking sheet a light tap with the palm of your hand or a flat surface. This helps round the macaron and also helps the pied or foot develop.
+ Before baking dry your macarons at room temp for anywhere between 15 to 30mins depending the humidity level. It's pretty dry in Arizona so 15 mins was plenty of time for mine. You will know they are done when you can touch the batter slightly with your finger and nothing sticks to your finger.
+ Place your baking sheet inside another baking sheet of the same size, doubling up on baking sheets prevents the bottom of the macaron from burning or being over baked.
+ Bake for 15 to 18 mins until slightly crisp on top. I would keep my eye on them from about 14mins onward as they can go from slightly undercooked to wayyyyyy too crispy in seconds.
+ Remove macarons and place on a wire rack to cool. In this time you can get the butter cream ready!
Raspberry Buttercream
Ingredients
8 tablespoons of softened unsalted butter
2/3 - 1 cup of powdered sugar or icing sugar
1/4 teaspoon of vanilla extract
2-3 fresh raspberries
+ Mash and soften butter with a spatula until butter becomes the consistency of mayo.
+ Slowly incorporate sugar, you can use your own taste buds and eyes to see if this is the right sweetness and consistency if this is too think then you can add cream or milk to thin this out.
+ Add vanilla extract and raspberries, you will notice your buttercream will become streaky red straight away. Mix the buttercream until you are happy with the color.
+ Add a small amount of buttercream to a macaron and sandwich between another!
+ Eat as many as your sweet little heart desires. I like to pair mine with a glass of almond milk or tea.
Happy baking friends!


Wednesday, March 20, 2013
Spring Magic

To celebrate spring we made oatmeal pancakes with fresh strawberries and yummy orange juice
Is it me or is there something utterly amazing about the season known as Spring? Everything is louder and unbound by the chill of winter, as the birds, wildlife and flowers come out of their winter hideaways, so do we. The layers of clothes and socks come off and if you're anything like me, wild horses could not keep you from wanting to be outside soaking up the rays from that glorious yellow ball in the sky.
I've spent the past year in South Dakota where our summers are hot but our winters are bitterly cold. You haven't had cold weather until you step outside on a winters day, take a deep breath and... your nose hairs freeze! Luckily last month we moved to a climate I am a little more familiar with. Arizona sure bought spring early to me this year.
Honestly, I cant expect my Aussie friends to relate too much. I spent the majority of my life living in a 365 day perpetual summer in Brisbane, Queensland. The summers were hot, humid and most likely spent by the beach or pool. The winters were cooler, a little less humid and most likely spent by the beach or pool, no joke! Although I loved and will continue to always love a Brisbane winter, the air is clear and crisp, the sky is always the bluest of blues and I would be at my absolute happiest riding a bike or visiting friends with a light cardigan and a pair of jeans. A change of season there wasn't a date or an event as such, it was a feeling. It would hit me like a bolt of lightning and I would know that winter had arrived.
How many Aussies out there have visited a country during the change of a season? I would love to know how much you loved it.
Moving to the Mid West gave me, for the first time, real SEASONS. Would you believe it people, they actually exist! Honestly they are the greatest display of nature I am ever come to see, from literally the dead of winter (and I mean dead, just a wash of white and grey as far the eye can see), to a miniscule green bud on a lonely branch which with time would become a symphony of yellow and green over every tree imaginable. The grass is so vibrant it's breathtaking, the flowers are making their debut for the first time and literally if you blink you will miss their grand entrance. It seems like whilst you sleep, nature is Spring bombing your back yard. Have you actually stopped to appreciate this show? If you can't answer, yes to my question, may I suggest you stop. Stop your busy life, stop writing that Tweet, stop downloading your latest hashtag ridden photograph to Instagram. I know the minute I hit publish, my shoes are on and I'm going to soak in some of Mother Natures half time show.
Monday, March 18, 2013
Today I made... Churros Cupcakes with Cinnamon Cream Cheese Frosting and Salted Dulce De Leche Sauce
That was a mouthful! Technically I didn't make them today (look at that, starting a blog and already rife with filthy lies!). Saturday was my husbands first company potluck event since he started his new job. It was a chance for everyone to get together, enjoy the amazing Arizona weather and for the wives to get to know each other. They had decided early on a Mexican theme, lots of yummy Carne Asada and salsa, rice, beans burritos, queso dip and lots more. As I am a fully fledged Occa, I had no idea how to make any specialty Mexican dishes, so I went to my fall back plan for everything... DESSERT!
I honestly do not know how I became such a "Little Betty Crocker" as most people refer to me. I am not a sweet tooth AT ALL. It started out at a young age I guess when my Ma used to get me to make my famous sponge cakes, I never remember eating them all I can recall is baking them. Clearly. I didn't have one of those CPS blacklisted mothers. I was responsible for adding ingredients, she would actually bake it. I always had such a sense of pride knowing that people loved my baking, I never really felt that way about cooking everyday meals.
I really didn't know what to make, a cupcake is a cupcake, the end. I needed something that was going to be enjoyed by all and still keep with the Mexican theme. A friend of mine was chatting with me and linked me to a great site which had a Cinco De Mayo themed Mexican Churro cupcake. I was sold!
I begun this process on Friday morning as making the Dulce De Leche takes about 3 hours!
No... don't run away yet. It is surprisingly easy, you just have to be prepared to devote a little time to ensure the sauce doesn't boil too hard or burn. The recipe I followed said it would take between 2-2.5 hours but mine took about 3 hours and wasn't as dark and thick as her pictures depicted but the end result was magical regardless. I am working with a new stove, so it is going to take me a while to get temps right etc.
Once the sauce was safe to be left alone for a while, I started on my Churros. I LOVE Churros, they are the right mixture of crunch, sweet and soft gooey middle. Much to my amazement they are really easy to make. If you attempt to make your own from the link below, I recommend you get your oil temp right, too cold and they will suck up a lot of nasty oil, too hot and you will have oil splatters and burnt churros for days!
Saturday came making the simple vanilla cinnamon cupcake and cinnamon cream cheese frosting. I note here that you really need to watch what you're doing when placing these babies in the oven. Once again I sustained a non life threatening hand injury whilst getting 24 cupcakes into the oven. I'm now sporting a trendy cats eye style burn on my right hand. Maybe that's why my mother then used to let me use the oven... hmmmmm.
What can I say, they were a huge success and I actually ate 2 (and a whole lot of left over frosting).
If you want to give this a go, don't be discouraged by the long list of ingredients and processes, they are all really easy and she has laid everything out do be as user friendly as possible.
Thank you Bakingdom
*Sorry for poor quality photos, making 3 hours sauces and taking cute photos simultaneously are not for forte. Hey, I said I was a baker not a baking photographer.


Thursday, March 14, 2013
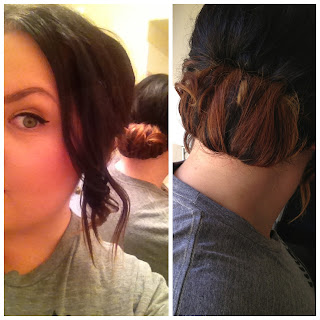
Hair-spriation
Last night the lovely Jenny from Confessions of a Hairstylist uploaded another great hair tutorial to her You Tube channel. I absolutely loved her Oscar hair tutorial series, if you have time check out her channel. For any occasion you can look like a star with her easy to follow tutorials.
This low rolled updo is simple, super stylish and down right perfect for me to get used to my first Arizona summer (it's 90 degrees in March or 32 degrees celsius for my Aussie loves). I loathe plain ponytails, so I'm always looking for hot little updos to get me through the heat. Check out how it's done on her channel. My attempt was a total success and plan on wearing my hair this way all the time now! I love how my ombre' gets to make an appearance too.
If you're an Instagram nut, like I am be sure to also follow her here theconfessionsofahairtsylist.
Happy styling friends!
This low rolled updo is simple, super stylish and down right perfect for me to get used to my first Arizona summer (it's 90 degrees in March or 32 degrees celsius for my Aussie loves). I loathe plain ponytails, so I'm always looking for hot little updos to get me through the heat. Check out how it's done on her channel. My attempt was a total success and plan on wearing my hair this way all the time now! I love how my ombre' gets to make an appearance too.

If you're an Instagram nut, like I am be sure to also follow her here theconfessionsofahairtsylist.
Happy styling friends!
Wednesday, March 13, 2013
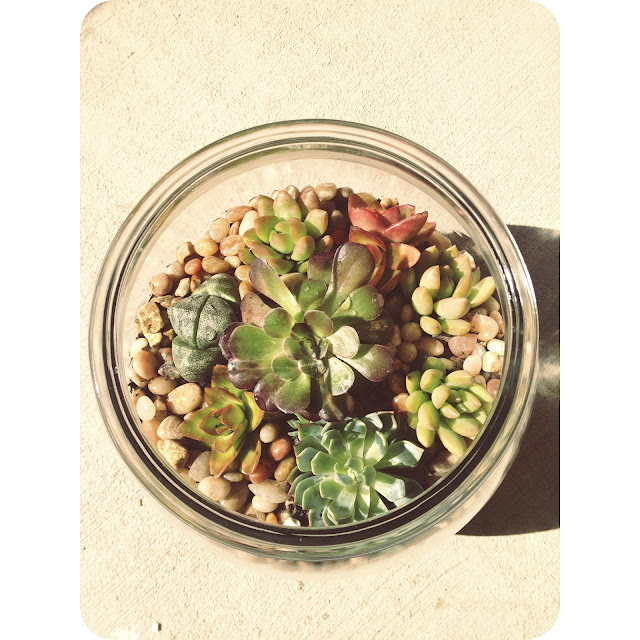
Today I made... A Terrarium
Can I just note that I have never been a gardener. I left that to my darling mother, she is the biggest and best green thumb I know. The woman seriously can not kill a plant, she has to kill them! I, on the other hand inherited the back thumb gene. Pansies, tulips, marigolds, petunias, you name it, I've killed it.
Once I moved to the US it was jaw droppingly awe-some having seasons. YES, a real Spring, Summer, Autumn (or Fall, if you want to get picky) and Winter. I never knew it could be possible but I loved gardening, growing herbs and plants from seed and watching them sprout into world like a proverbial phoenix rising from the ashes. It was for lack of a better word, thrilling! Then Summer rolled along, a heat wave ensued and all my hard work sat fried and crispy on my balcony. That's all I will say about that, it was a tough time in my gardening history and lets just say I am still working through my issues with the season known a Death (acough, I mean Summer).
Alas, I digress. The sole purpose of today's post is to show the blackest of thumbs that you are not alone, you no longer have to sit in your plant-less homes, you will no longer have to jolt awake at 3am wondering if you watered your photosynthesis, CO2 guzzling friends. For today is the day you too can know the love of a succulent in just a few easy steps. Let's start shall we...


All you need to begin are a few readily available ingredients and you are cooking with plants.
It's important when creating an enclosed environment to have a well ventilated home. This ensures that any impurities and humidity don't clog your plants or their air.
1. Find yourself a sweet little terrarium. I found mine for about $12 at Michaels
2. Start with a good drainage base; I chose colored gravel. Place a layer approx 1 inch thick at the base.
3. Activated Charcoal; may sound odd but this actually draws nasty impurities out of your little habitat you are creating. I just picked up this from my local Pet Smart. Apply a thin layer over your gravel base. Working with charcoal can be a bit of a mess, let's just say after I finished washing the product and getting it into the terrarium, I looked dirtier than one of Dick Van Dyke's sidekicks singing Step in Time on the rooftop.
Next: Soil (DUH); I didn't think I had to put a step in for this. Use approx 1-2 inches of potting mix, dependent on how big your succulents are and their roots.
4a. The flora; I chose these based on the size of my terrarium and also because Mr. J and I thought they were pretty! I am not going to get all greenhouse nerd and give you the technical names. But, if you do want to know what types of succulent I used, feel free to leave a comment.
4b. Ensure you enough room between each plant to let their roots spread a little as they get used to their new home. Make an indentation in the soil and arrange as to what you find ascetically pleasing.
5. Top off with a few small river rocks and your horticulture masterpiece is complete.
6. Give the little guys a light watering. They have just been through hell. I'm sure you're pretty thirsty when you move house, aren't you?
There you have it! A fully functional LIVING succulent terrarium to be your next conversation piece at your latest dinner party, keg party, bridal party, slumber party, baby party...
NOTE: I did sustain a minor non-life threatening knuckle injury whilst working with these thorny little suckers. I did not however break a nail. You have been warned.


Tuesday, March 12, 2013
Ahhh yes, introductions

Allow me to introduce myself, I'm Kez.
I was born in Middle Earth itself (AKA New Zealand), my parents, having inherited some strain of gypsy unknown to the rest of the family history, moved myself and my younger brother to the sunburnt country across the pond (AKA Australia or 'Straya for you true blue Aussies) at a young age.
Ahhh, you see a pattern forming already, don't you?
Having restless gypsies for parents meant, we never stayed in a home for more than 5 years (that was a lifetime in our family) and we got to enjoy the splendor of the Queensland public educational system in many different classrooms. We were never shy about making new friends, usually it was as simple as asking someone you just met if you could sit with them in their "hangout" spot for lunch on your first day. There you have it, instant besties!
As the years went on my parents started to settle and by settle, I mean they stayed in one home for more than 5 years, so it was more like 7 years. I was out and about getting itchy feet, why hadn't we moved again? Clearly I craved for something more, it turns out I was craving travel, adventure, excitement. I worked 7 days and nights a week, working 13-15 hour days and saving every single cent I had in a box under my bed. I was going somewhere no-one in my family had ventured. I was heading for America!
I met up with one of my best friends in San Diego where she was living at the time, she showed the ropes of life in America and I was on my way, I travelled different states, enjoyed food, company, music, life and eventually love!
Mr. J and I met in Denver, it was a whirlwind of head fogging, heart gagging, tummy summersaulting love. Which soon came to a sobering end when my visa was up and I had to leave the country. Honestly, who does long distance at 22? I spent time in Canada hoping to get that same feeling I got when I was in the US. It was a smell, a feeling, it was something to this day I can't explain, it just felt like home.
Leaving the US with a heavy/ broken heart and skip 4 years later without any contact from Mr. J. I was older had moved around a little more and still unsettled when through the magic of social networking he contacted me. Six months later, a quick trip across the Atlantic and we were engaged on a snowy bridge over a frozen waterfall by the end of November 2010. We married May 2011 in Australia and after a very lengthy but smooth flowing visa process, here we are.
... And this is where my blog comes in. It's been over a year since I set foot on US soil and a legal American Resident and what better than to share my adventures with total strangers!
I can't believe how different things can be, we all speak english, we all wear the same clothes and eat the same food (ok, sorta) but when it comes to living in the land of the free, there is still a lot I have to learn. I am going to enjoy sharing it all with you.
Through this blog I am going to be sharing lots of handy information to all you Aussie expats out there. Sharing thoughts, lots of photographs, lifestyle posts, Do It Yourselfs and just plenty of good ole stuff to get your brain thinking and your heart inspired.

Monday, March 11, 2013
Enough Procrastinating
I have been getting a new blog look ready before I launch. I am incredibly excited to start this new adventure.
Subscribe to:
Posts (Atom)
